How to Publish Obsidian Notes Website For Free (digital garden or blog)
Digital Garden Walkthrough Guide
So! You like what you see here in my digital garden? 👀 I'm so glad! It's been an idea at the back of my mind to build this digital garden so I can Learn In Public and I'm pumped you align with my philosophy.
Building this website was actually surprisingly easy to do, and I have very little coding experience!
My estimate is that this tutorial will take you ~30-45 minutes, but it may vary depending on your familiarity with GitHub, hosting services, and domain name servers (DNS). You might also have to wait for the custom domain name propagation if you decide to go that route (Phase 3).
Don't worry, if any of that means nothing to you, I created a full YouTube tutorial to guide you along the way, step-by-step 🫡
The Tutorial Video can be found here
If you would prefer to read the tutorial at your own pace, continue with this page. I'll link out to explanations on the different technical elements as we go, so you can always gain context on what you're building if you wish (one of the main benefits of building linked-notes in a digital garden vs a blog) 👀
There is so much value to Computer-Supported Collaborative Learning online, I can't wait to see what you build ✨
For anyone interested, I will be creating a list of everyone who built a digital garden using my tutorial, so please feel free to let me know in the YouTube video comments if you found it helpful!
Ongoing List of Digital Gardens
Building This Website: Three Phases
There are three phases to build this website:
Phase 1: The theory & philosophy of Digital Gardens (why build a website this way)
- You'll understand the publishing flow of the digital garden plugin better if you understand what a digital garden is.
Phase 2: Building the publishing flow from Obsidian to your hosting provider (automating publishing to your website)
- Obsidian Vault Creation
- GitHub Account Creation
- Digital Garden Plugin Installation
- Hosting Service Set-Up (I used Netlify, but you can use Vercel or GitHub Pages or another hosting service)
- Hosting Alternatives (other than Vercel)
Phase 3: Customizing your website (personalizing in your own style/personal brand)
- Custom Theme (Notes & Appearance)
- Custom Domain
- Custom Public Personal Knowledge Management System
If you're familiar with the theory behind digital gardens, please feel free to skip to Phase 2: How to Publish Obsidian Notes Website For Free (digital garden or blog)#Phase 2 Building & Deploying Your Website.
Phase 1: Theory & Philosophy
I'll share more details as I build up my Digital Garden, but please check out: what is a digital garden? for more details if you're interested in the theory of non-linear creation.
For more details, please check out my YouTube Video on the Benefits & Philosophy of Digital Gardening:
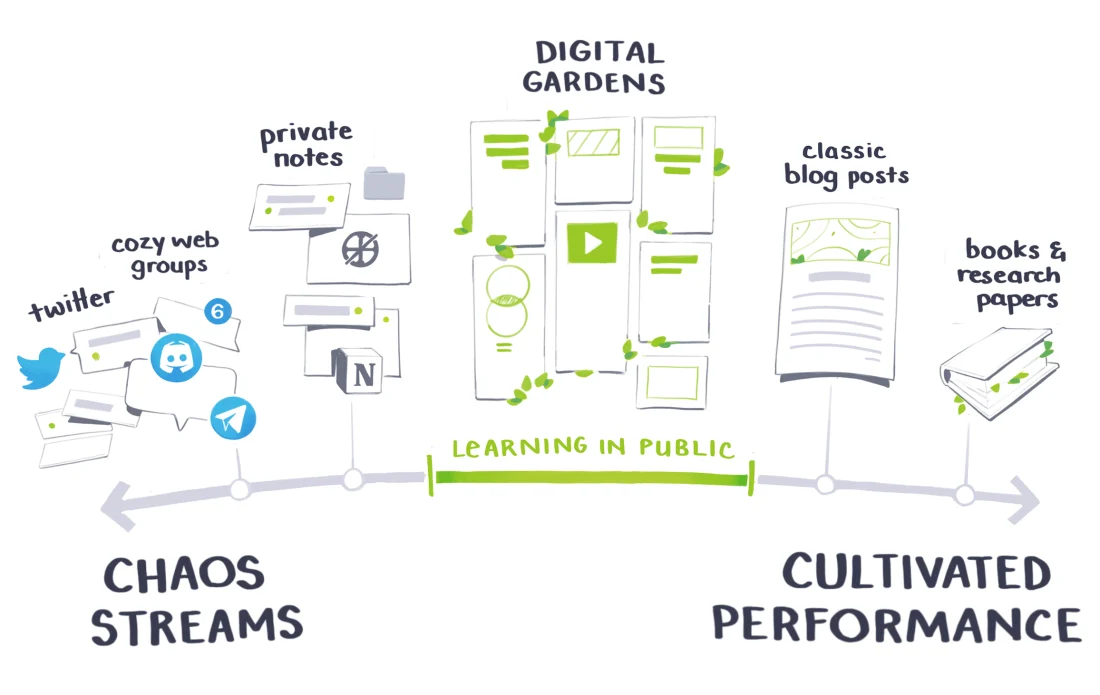
I've also shared my favourite images from Maggie Appleton's article on the history of digital gardening here, as I think they are an excellent visual aid to understanding where digital gardens (your new website) fits into the Internet and your publishing process.
The goal is to think non-linearly: write what you feel like, build on it day-by-day, go with the flow 🌊
When you identify a topic that really resonates, or you have a flash of insight, you can cultivate your idea seeds into full blown blogs/articles.
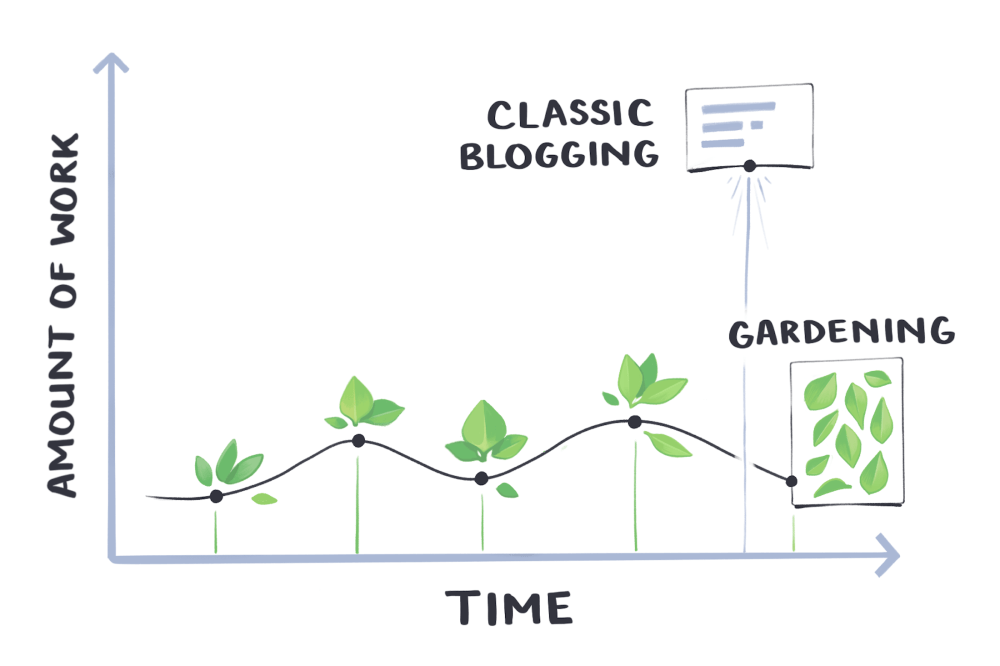
Another goal is to provide a low-friction publishing system to get your ideas out there in public, without fear of imposter syndrome or perfectionism (that typically avails bloggers/article writers). This digital garden space is as permanent as you want it to be, in high contrast to the chaos streams of social media.
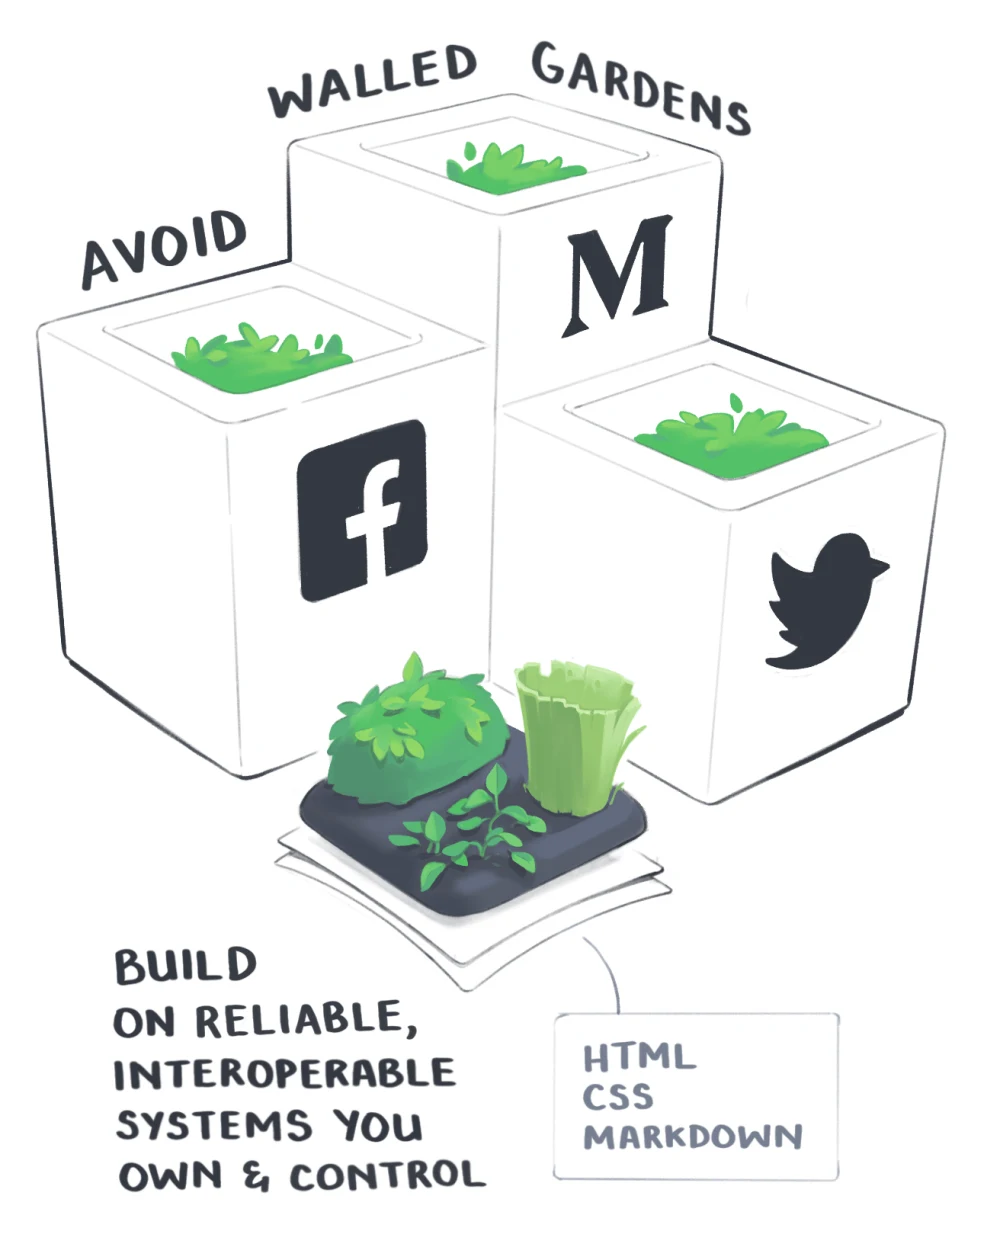
Finally, building your own website enables true self-sovereignty, an underrated concept in the modern digital era. Building with Obsidian enables the creation of universally readable Markdown files that are stored locally on your computer and publishable to your own personal website.
This publishing system is future-proofed & permissionless, giving you great flexibility for the future and security that a platform won't rug you.
I'm working on another YouTube video to give context on digital gardens, so stay tuned for more information 🌱
Phase 2: Building & Deploying Your Website
Now that you have a brief understanding of the ethos of this website, let's take a look at what it takes to build it!
Here's a Quick Overview of the process:
- Obsidian Vault Creation
- GitHub Account Creation
- Netlify --> GitHub Connection (Or other Hosting Service)
- Deploy Digital Garden to Hosting Service
- Digital Garden Plugin Installation
- GitHub --> Obsidian Connection
- DG Publish Settings & Template Creation
Here's the official Digital Garden Getting Started Guide as well, which has many of the links I'm sharing below.
1. Install Obsidian
First, you'll have to set up an Obsidian Vault if you haven't already. You can download Obsidian here.
I recommend creating a folder for your Digital Garden notes, but it's completely up to you. I use the Auto Note Mover Plugin to automatically move any note with the tag "#digitalgarden" to my Digital Garden folder to keep myself organized.
2. Create GitHub Account
Second, you'll have to create a GitHub Account, if you don't already have one. You can create a GitHub account here.
3. Connect GitHub to Hosting Provider (Netlify)
Third, you need to establish a connection between a hosting service and your GitHub account. My suggestion is to use Netlify, as they are a great free hosting provider and offer free encryption (aka turn http --> https) to secure your website.
You can use your GitHub account to directly sign in with Netlify, which really simplifies the rest of the deployment process.
4. Deploy Digital Garden Repository With Hosting Provider
Fourth, you need to deploy your digital garden website through Netlify (or Vercel, GitHub Pages, or other) to clone the digital garden repository to your own GitHub account.
If using Vercel, you can use the deploy button on the main digital garden repository page. However, I have heard of people having sync issues with Vercel due to rate limiting publishing steps (e.g., can only make 30 changes a day on the free plan). The Digital Garden Plugin may have solved this issue by the time you read this, but it was enough of a problem in the Discord that I chose to use Netlify instead.
To deploy to Netlify, click on "Hosting Alternatives" where there is a specific "deploy" link for Netlify. Clicking on this will clone & deploy the digital garden repository through Netlify.
5. Install Obsidian Digital Garden Plugin
Fifth, you need to install the Digital Garden Plugin, in Obsidian. To do so, you can go to settings, community plugins (enable them if they are disabled), search "digital garden", and install & activate the Digital Garden Plugin.
6. Connect Obsidian to GitHub (Generate Token Access)
Sixth, you'll need to connect your GitHub to the Digital Garden Plugin using a token. You can use either a Classic Token or a Fine-Grained Token. If you have more than one GitHub repository, I recommend using a Fine-Grained Token because this only gives access to your Digital Garden Repository, rather than all of your repositories.
If using a fine-grained token, you'll need to give read & write permissions to the content and pull request sections of the token. Once complete, you will receive the fine-grained token. This token will only appear once, so your must ensure that you have copied it to a safe place for future reference (I created a note in Obsidian for it).
You can then copy your token into the digital garden plugin settings on Obsidian, along with your repository name & GitHub account name. If successful, you will see a green checkmark appear ✅.
6.1 Change GitHub Repo to Private
Optional Step: Make your GitHub Repository Private.
For security purposes, I suggest changing your GitHub repository to private. Even though your digital garden website will be public, that does not mean you need to give easy access to the markdown files in your GitHub repository.
To change your repository visibility, go to your GitHub Digital Garden Repository, click on settings at the top, scroll to the bottom to the "Danger Zone", and change visibility to private.
You will receive a warning that you will lose your stars & watchers, but that's okay, you've just cloned the repo at this point and its better, imo, to make it private.
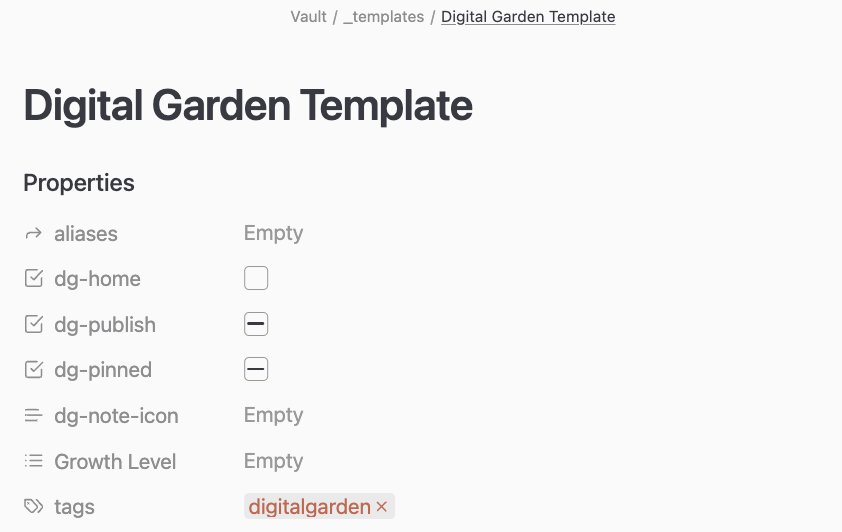
7. Add DG Properties & Create Template
Seventh, you'll need to add the digital garden properties to your notes so that the Digital Garden Plugin in Obsidian knows which notes to publish, and which notes to keep private.
You can add two new properties: dg-home & dg-publish, both as a checkbox type.
I recommend making a Digital Garden Template to speed up the process of making your notes eligible for your digital garden. I also suggest including the aliases property and the tags property.
You can also add the dg-pinned property, which keeps the file pinned at the top of its respective folder in the sidebar of your digital garden (which we'll set up in a moment). The dg-note-icon will give your notes a respective icon level, depending on how Cultivated it is:
1 = seed (atom)
2 = tree (molecule)
3 = fruit (alloy)
See also: Mind Garden Legend (how this system works) for my system.
8. Publish Home Note + Other Notes (optional Hot Key)
Eighth, it's time to publish your home note!
By checking the dg-home checkbox property, that note will become your de facto digital garden home. ONLY ONE of your notes should ever have this property checked, otherwise you will have a conflict.
You can then check the dg-publish box and press cmd + p (or ctr + p for Windows) to pull up the command palette. Search for "publish" and you will see two options:
- digital garden publish single note
- digital garden publish multiple notes
You can select single note to publish the current note, or multiple notes to publish all changed notes.
I also created a hotkey for publishing multiple notes (cmd + shift + p) so that I can easily publish notes as I change them, without having to go into the command palette.
Remember, each time you run this command, your hosting provider builds your website again, which eats into your monthly build minutes. It's better to make the changes you want and then batch publish them, rather than deploying the build of your website over and over again.
9. Start Linking Notes to Home Note
Ninth, you're ready to link more notes to your home page to build out your garden!
As with all Obsidian notes, you can create Bi-Directional Links with the two open square brackets.
I suggest starting with your 🏡 Digital Garden Home ✅ 🌀🌐 and moving outwards from there.
Don't overthink it! The point of a digital garden is to reduce friction, so you should go with the flow as you can 🌱 🌊
Phase 3: Customizing Branding & Personalization
Let's take a look at the other settings in the Digital Garden Plugin on Obsidian.
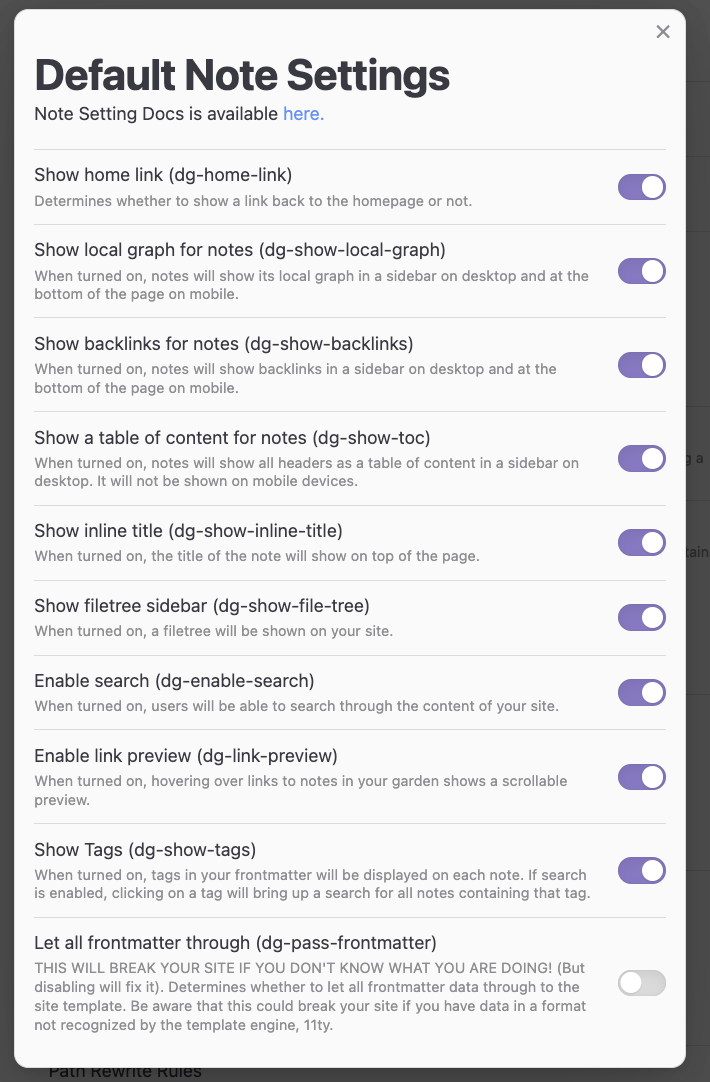
Global Note Settings
You can see that there's a section under Features for "Global Note Settings", as I talk about in the video, I recommend turning all but the bottom settings on.
If you go to my 🏡 Digital Garden Home ✅ 🌀🌐, you can see all of these settings in action.
Appearance
You can change the title of your website (not the custom domain name, more on that in a moment). As you can see on my 🏡 Digital Garden Home ✅ 🌀🌐, the name of my website is Wanderloots' Words.
You can also turn on timestamping for creation & updates. These settings will appear at the top of your note and can let your readers know how up-to-date the note is.
Finally, you can change the Theme of your digital garden. I recommend exploring in the theme section of Obsidian, where you can preview the themes, before changing the appearance in the digital garden plugin. This previewing will save your build minutes 😊.
My theme is currently: Dune, and in the tutorial video, was Aurora Twilight.
You can also bring in custom css settings, but I'll get into that another time.
Path Rewrite Rules
Once you have turned on the filetree option in the Global Note Settings, you can rewrite the path of your notes in your digital garden folder system. This setting allows you to use a more complicated folder structure in your obsidian vault, without complicating your website
For example, my Digital Garden folder is within the overall Vault folder of my website. Rather than having the filetree of my website go:
- vault
- digital garden
- published
- digital garden
I can rewrite the path using - vault/digital garden:digital garden. On my website, it will now appear as:
- digital garden
- published
You can use this any way you want to help organize the structure of your website.
Base URL --> Custom Domain Name Setup
If you go back into Settings --> Digital Garden Plugin, you will see that there's an option to change your "Base URL". This Base URL setting helps with the sitemap for your website, which can improve its SEO.
But, in order to change the Base URL, we must first acquire and connect a custom domain name, the final step of this tutorial.
Purchase Custom Domain (NameCheap)
You can use any number of websites to purchase your custom domain. I personally have found NameCheap to be the one of the easiest and cheapest DNS providers, so I recommend checking them out.
Your custom domain should, imo, reflect your brand, either business or personal. For more information on the power and importance of branding & digital identity, check out my YouTube video:
For my website, I went with my personal brand: Wanderloots. Since I already have my blog website as wanderloots.com, I chose wanderloots.xyz.
Connect DNS Provider to Hosting Provider
Next, you'll have to go back to your hosting provider (in my case, Netlify) and go to domains on the left hand side.
You can click "add a domain" and type in your newly purchased domain name from Namecheap.
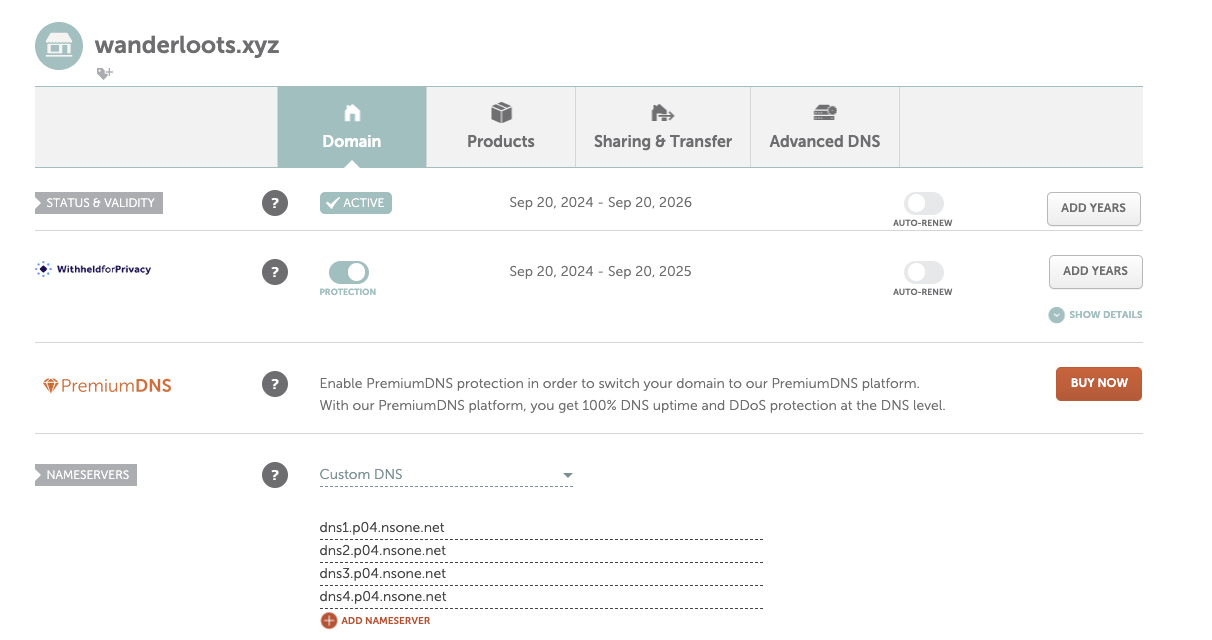
Once you've added the custom domain to Netlify, you'll get a list of Netlify's Name servers:

Next, you can go back to NameCheap to change your DNS Name Server to "custom". You need to copy all of these name servers into NameCheap and click "save".
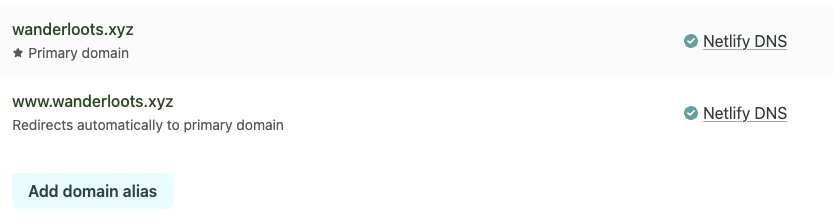
Once this is done, you can go back to Netlify --> Sites --> Click on your website build. On the lefthand side, you'll see "domain management". You can wait here until you get the green checkmark beside your Netlify DNS, like this:
Depending on the propagation path, it can take anywhere from 10 minutes to 2 days (48 hours) for this propagation to occur. It took me 20 minutes.
Securing Custom Domain with Let's Encrypt (or SSL certificate)
Once the propagation has completed and you see the green checkmarks, you have successfully directed your digital garden website to your custom domain name. However, this domain will be at "http", not "https", which means your custom domain is not secure.
Thankfully, Netlify offers free encryption through "Let's Encrypt".
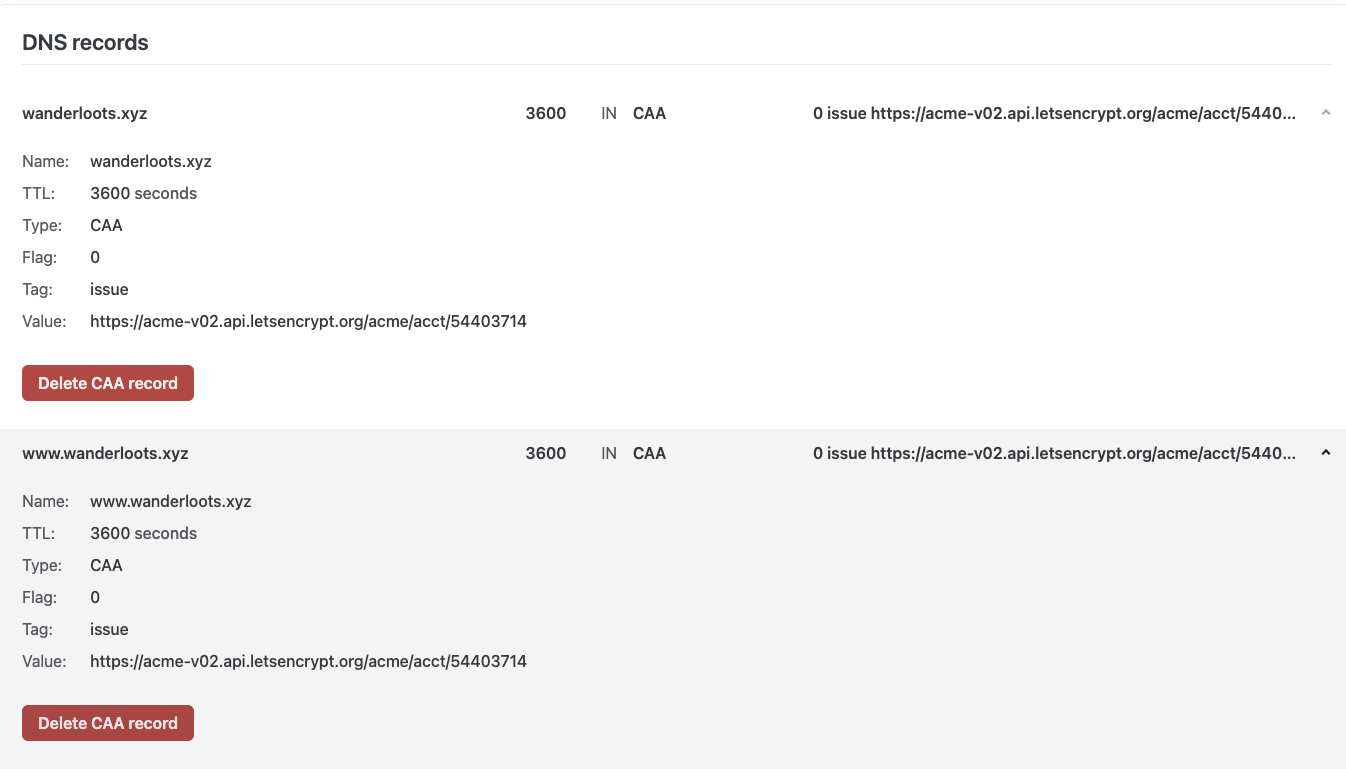
To connect your free encryption, go back to your Digital Garden Home in netlify (top left button). Then, go to Domains, where you should see "DNS Settings" and "DNS Records"
You need to add two new CAA DNS records: one for your main domain (wanderloots.xyz) and one for a wildcard that includes www (www.wanderloots.xyz).
Each record should have:
- Type: CAA
- Flag: 0
- Tag: Issue
- Value: https://acme-v02.api.letsencrypt.org/acme/acct/54403714
You can read more about the Let's Encrypt setup and functionality here
Once you click save, you can go back to your domain management (Sites --> Project --> Domain Management) and scroll to the bottom where you can see "HTTPS". Click refresh, and you should have activated your TLS certificate (an updated and more secure version of SSL).
Now, if you go back to your custom domain, you should see that the "not secure" warning has disappeared.
Huzzah!
Conclusion
There you have it! You have successfully launched your own website from your Obsidian Notes, for free, and with a small fee, created a custom domain name for your website to build up your personal brand.
Congratulations!
The next step is the fun part: start writing your notes, planting idea seeds, and Cultivating Knowledge in your digital garden 🌱 🌳 🍎
If you found this tutorial/YouTube video helpful, please consider subscribing & sharing with a friend. Word of mouth is by far the best way for me to grow my own personal brand, so I really appreciate your support 🫡
I will continue making more videos/tutorials on how to build up the functionality of your digital garden, including the Auto Note Mover Plugin & Dataview Plugin, which you can see the result of in my Sources - Books & Articles page.
If you're interested in going deeper into the production of your ideas and leveraging them in the Creator Economy, consider joining my Recalibrating Hypersub, an exclusive community where I help knowledge workers & creators build and solve problems 🧭 🧠 ✨
Related tutorials:
Links Referenced In YouTube Video:
- My Digital Garden Home
- Wanderloots' Website
- Maggie Appleton On Digital Garden History
- Obsidian Note-Taking App
- GitHub Account Creation
- Digital Garden Plugin Guide
- Netlify Hosting Provider
- Digital Garden Deploy to GitHub (for Netlify or Other Hosting)
- Digital Garden Deploy to GitHub (for Vercel)
- NameCheap Custom Domain
- "Let's Encrypt" free https enablement via CAA on Netlify. Settings:
- CAA
- flag = 0
- issue
- https://acme-v02.api.letsencrypt.org/acme/acct/54403714